
PUBLISHING PRESENTATION
User can publish PowerPoint presentation slides as:
- A PowerPoint presentation file (.ppt)
- A Web page (.html)
- Image files (.jpeg, .gif, .png, .tif)
Publishing a PowerPoint (.ppt) file
Advantages:
- By default, files created with PowerPoint are saved as .ppt files. User can simply publish the .ppt file to your ITS Course Web Space and create a link to that file.
- The file is easy to open. When users click the link to the presentation, the browser 1) prompts them to open or save the file or 2) opens the presentation in PowerPoint.
Disadvantages:
- Some users may not have access to PowerPoint.
- Published PowerPoint files are not secure. Users can download the original file, change the content, and use the information as their own.
Publishing the PowerPoint presentation as a Web page (.html) file
Advantages:
- PowerPoint is not required to view the presentation. Users can open the presentation in any Web browser.
- The Web page is more secure than a .ppt file.
- Disadvantages:
- Saving a PowerPoint presentation as a Web page creates many files (.htm, .xml, and image files) from a single presentation file. You must publish all of these files to your course space.
- Users can only print one slide at a time from the original presentation.
Publishing the presentation as image files (.jpeg or .gif)
Advantages:
- PowerPoint is not required to view the presentation.
- It is more secure than a .ppt file because users cannot change the content of the slides.
- PowerPoint slides can be used as stand-alone images on the course Web page without using another graphic program.
Disadvantage:
- Because user have transformed your slides into separate images, they function as stand-alone files rather than a self-contained presentation.
THE PUBLISH OPTIONS -
In PowerPoint 2007 , The Office Button has option "Publish ".
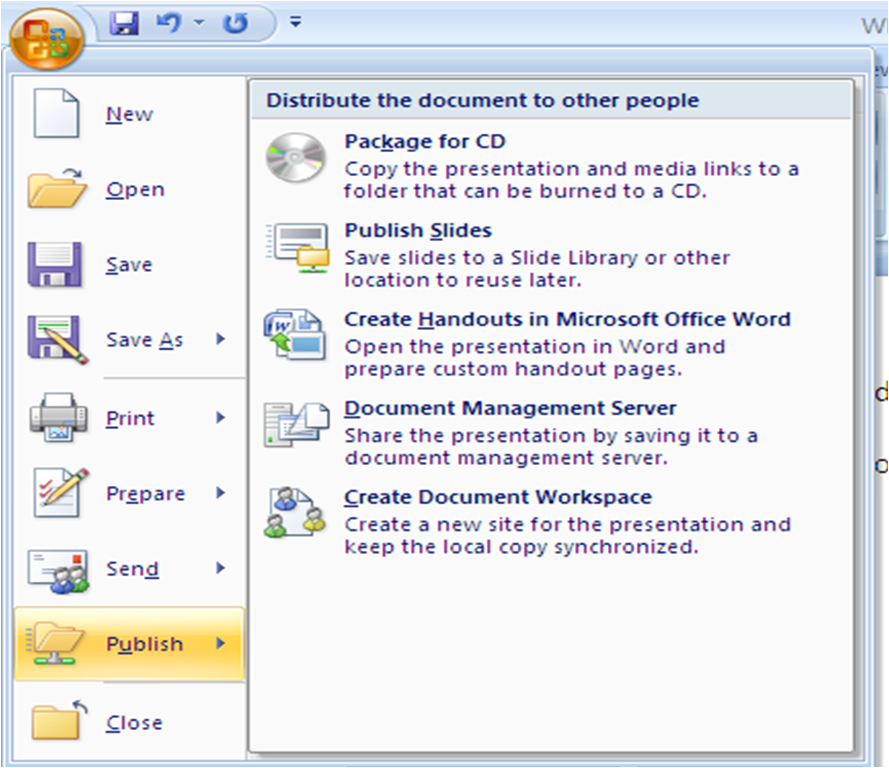
THE OPTIONS OF PUBLISH ARE-
1. ‘Package for CD’
This option allows user to directly copy the files to a CD or copy to a folder and then transfer it to the CD.
Despite the name ‘Package to CD‘ user can use a DVD or Bluray disk too.The package can also be saved to a USB memory stick or any other type of storage.
The Package for CD feature simplifies moving and updating all linked files together with the presentation to a folder or to a CD. By default, when the files are copied to a folder or to a CD, the PowerPoint Viewer is included in the package.
In Microsoft Windows XP, the Package for CD feature uses the Windows XP CD-burning feature.
In Microsoft Windows 2000, user must copy your files to a folder, and then burn the folder to a CD by using a third-party CD-burning program.
In Windows XP, if user want to use a third-party CD-burning program, copy the files to a folder.
PROCESS
1. Click Publish > Package for CD.
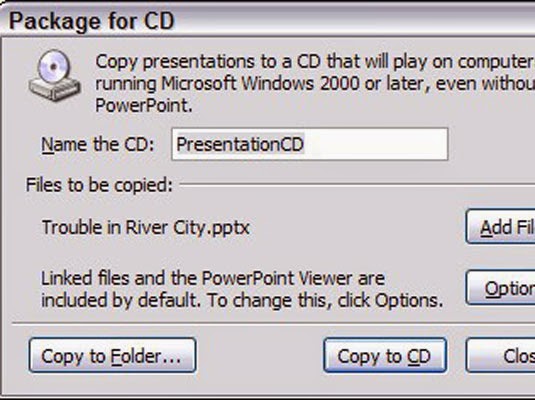
2. Click "OPTIONS" to change to desired preferences.
The Options Box Appear. Change options settings.
The options that are available are:
- Make a Self-Running Package: Creates a CD that automatically plays the presentation when the CD is inserted into a computer.
- Make a Package by Using Original File Formats: Instructs the Package to CD Wizard to copy the presentation files to CD.
- Linked Files: Select this option to include any linked video or audio files.
- Embedded TrueType Fonts: Ensures that the fonts you use in your presentation are on another computer.
- *Password to Open Each File: Require a password if the presentation contains top-secret information.
- Password to Modify Each File: Require a password to prevent unauthorized people from changing the presentation.
- Inspect Presentations for Inappropriate or Private Information: Checks for any personal information that might be embedded in your presentation.
4. To add other presentations to the CD, click Add Files, select the files that to add, and then click Add.
5. Click Copy to CD.
6.Insert a blank CD into the drive when prompted.
7. Remove the CD and then click Yes to make another copy. Otherwise, click No and then click Close.
2. ‘Publish Slides’
The user use Publish Slides . The slides are published to the slide library .
A Slide Library is a special type of library in Microsoft Office SharePoint Server 2007 used to share and reuse Microsoft Office PowerPoint 2007 slides in a central location.
To store, share, and reuse slides in a Slide Library, the computer must have Microsoft Office PowerPoint 2007 installed. Slide Libraries support only PowerPoint 2007 .pptx files that contain multiple slides or .ppt files that contain just one slide.
When user publish a presentation to a slide library, the slides upload as individual files, so they can be modified and tracked independently.
ADVANTAGES OF LIBRARY-
- The library maintains a link to the presentation, so that user are notified when slides change.
- The library allows to sort slides, check them out, and can help keep track of history.
- Slide Libraries help to share, store, and manage Microsoft Office PowerPoint 2007 slides.
PROCESS
To create a Slide Library, user need to have Designer permissions.
If a Slide Library has not been created for the site, user must first create a Slide Library in Office SharePoint Server 2007 before adding Office PowerPoint 2007 slides to it.
 menu, click Create.
2. Under Libraries, click Slide Library.
If a Slide Library has not been created for the site, user must first create a Slide Library in Office SharePoint Server 2007 before adding Office PowerPoint 2007 slides to it.
menu, click Create.2. Under Libraries, click Slide Library.
Slide Libraries can be created in only certain types of sites, such as a Team site and Document Workspace. If user do not see Slide Library under Libraries, the type of site working on does not support Slide Libraries.
3. On the New page, under Name, type a name for the library. The name appears in any navigation links that user set up.
4. Under Description, type an optional description.
5. Click Create..
3. On the New page, under Name, type a name for the library. The name appears in any navigation links that user set up.
4. Under Description, type an optional description.
5. Click Create..
3. ‘Create Handouts in Microsoft Office Word ’
To create handouts that are more elaborate than what user can make in
Microsoft Office PowerPoint 2007, print the handouts from Microsoft
Office Word 2007.
When user create slides in Microsoft PowerPoint, the program includes a
Notes section to input additional information that appears on printed
handouts, or can print the slides in smaller sizes, several to a
page, to help the audience follow along.
While convenient, the Notes
area lacks any formatting tools and the print command just reproduces
the slides.
For more visually appealing handouts, PowerPoint allows to transfer the slides with their notes into Microsoft Word, where user will find a vast array of format and style tools to spruce up the
handouts.
PROCESS -
1. Click Create Handouts in Microsoft Office Word on office button.
2. Select the layout of choice :
Now user will get a pop up window that provides you various alternatives for page layouts in MS Word.
The options are as follows:
4. ‘Document Management Server ’
It is an option that allows user to select a network share that points to a SharePoint site.
You can put the SharePoint site path directly in the File name box if you know it and PowerPoint will save the file in SharePoint.
To show Document Management pane, select Server > Document Management Information.
5. ‘Create Document Workspace ’
A Document Workspace site is a SharePoint site that helps user to coordinate the development of one or more related documents with other people.
The site provides tools to share and update files and to keep people informed about the status of those files.
When user create a site that is based on files from 2007 Microsoft PowerPoint, or Visio — user can work directly in the file on the Document Workspace site or work on their own copy.
Users can periodically update the copy with changes from the server or update the server with changes from their copy.
When user create a Document Workspace site, the file is stored in a document library on the site, where members can work with the file by using a Microsoft Office program or view the file in a Web browser. Members can also add related files to the library.
Libraries can track versions of files, so that people see a history of changes and can restore a previous version if necessary.
Libraries can also require approval of files and require documents to be checked out to prevent people from making conflicting changes at the same time.
1. From the document Management Task Pane .
2. By Sending Email .
3. From a document that is already in a SharePoint library
4. From a SharePoint site
1. From the Document Management task pane
Creating a Document Workspace site is one of the ways that user can share a file when working in any of the following 2007 Office release programs: Word, Excel, PowerPoint, or Visio.
This method may be best if already working in a file and want to create a workspace without leaving the program.
2. By sending e-mail
User can create a Document Workspace site when sending a file as a shared attachment in an e-mail message.
As the sender of the shared attachment, user become the administrator of the workspace.
All the recipients of the message become members of the Document Workspace site, where they are granted permission to contribute to the site.
This method is used when user want to combine the creation of the workspace with inviting members to the site.
If user set up a Document Workspace site by sending e-mail from Microsoft Office Outlook 2007, the people whom to include in the To and Cc boxes of the message are automatically added as members of the site.
If user use a different procedure to create a workspace, they can add other members after creating the site.
3. From a document that is already in a SharePoint library
This method is used when the file is already stored in a library on a SharePoint site. As user update the file on the Document Workspace site, they can update the original copy in the library with the changes.
4. From a SharePoint site
This method creates a Document Workspace site when user is working on the SharePoint site in a Web browser.
This method enables to choose more details when creating the site, such as the description, user permissions, and the last part of the site's Web address.
Now user will get a pop up window that provides you various alternatives for page layouts in MS Word.
The options are as follows:
- Notes next to slides- Option to share the presentation with people who have not attended your presentation.
- Blank lines next to slides- Option to create training handouts.
- Notes below slides - Option if the notes are lengthy.
- Blank lines below slides- Option to create quiz handouts for e-learning courses.
- Outline only option - To distribute the text heavy slides.
4. ‘Document Management Server ’
It is an option that allows user to select a network share that points to a SharePoint site.
You can put the SharePoint site path directly in the File name box if you know it and PowerPoint will save the file in SharePoint.
To show Document Management pane, select Server > Document Management Information.
5. ‘Create Document Workspace ’
A Document Workspace site is a SharePoint site that helps user to coordinate the development of one or more related documents with other people.
The site provides tools to share and update files and to keep people informed about the status of those files.
When user create a site that is based on files from 2007 Microsoft PowerPoint, or Visio — user can work directly in the file on the Document Workspace site or work on their own copy.
Users can periodically update the copy with changes from the server or update the server with changes from their copy.
When user create a Document Workspace site, the file is stored in a document library on the site, where members can work with the file by using a Microsoft Office program or view the file in a Web browser. Members can also add related files to the library.
Libraries can track versions of files, so that people see a history of changes and can restore a previous version if necessary.
Libraries can also require approval of files and require documents to be checked out to prevent people from making conflicting changes at the same time.
A Document Workspace site also provides lists that help the team to communicate and track tasks, such as announcements and
links.
Example
User might want to introduce a new team member who is
working on the project or share a link to a related Web site.User can
also sign up to get alerts for the document or the workspace, so that
you receive an e-mail message when someone changes a document or adds
new content.
Ways to create a Document Workspace site
When creating a Document Workspace site, user can start using it right away, add other lists or libraries to it, or customize the site to suit their specific needs.1. From the document Management Task Pane .
2. By Sending Email .
3. From a document that is already in a SharePoint library
4. From a SharePoint site
1. From the Document Management task pane
Creating a Document Workspace site is one of the ways that user can share a file when working in any of the following 2007 Office release programs: Word, Excel, PowerPoint, or Visio.
This method may be best if already working in a file and want to create a workspace without leaving the program.
2. By sending e-mail
User can create a Document Workspace site when sending a file as a shared attachment in an e-mail message.
As the sender of the shared attachment, user become the administrator of the workspace.
All the recipients of the message become members of the Document Workspace site, where they are granted permission to contribute to the site.
This method is used when user want to combine the creation of the workspace with inviting members to the site.
If user set up a Document Workspace site by sending e-mail from Microsoft Office Outlook 2007, the people whom to include in the To and Cc boxes of the message are automatically added as members of the site.
If user use a different procedure to create a workspace, they can add other members after creating the site.
3. From a document that is already in a SharePoint library
This method is used when the file is already stored in a library on a SharePoint site. As user update the file on the Document Workspace site, they can update the original copy in the library with the changes.
4. From a SharePoint site
This method creates a Document Workspace site when user is working on the SharePoint site in a Web browser.
This method enables to choose more details when creating the site, such as the description, user permissions, and the last part of the site's Web address.
SHARING A PRESENTATION
THERE ARE MANY WAYS BY WHICH POWERPOINT PRESENTATION FILE CAN BE SHARED :
1.Sending a copy of document as attachment.
2. Publish as HTML WEB Page .
3. Flash It
4. Online Presentation Websites .
5. 2010 Advanced Options .
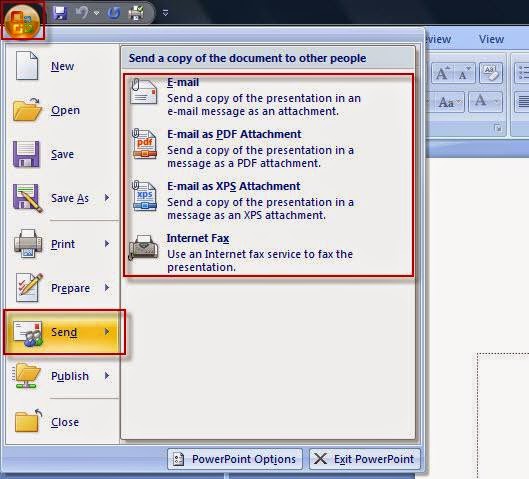
1. SENDING A COPY OF DOCUMENT AS ATTACHMENT :
PowerPoint 2007 allows user to send the file to other people using SEND Option in Office Button .
-
Email to attach the presentation to an e-mail message.
-
E-mail as PDF Attachment to send presentation as a Portable Document Format (.pdf) file, and then attach
the PDF file to an e-mail message.
-
Email as XPS Attachment to save presentation as a .xps file, and then attach the file to a e-mail
message.
- Send as Internet Fax to send presentation as a fax without using a fax machine.
2. PUBLISH AS HTML WEB PAGE
PowerPoint lets save the presentation in
HTML, as a web page,
When user has got the presentation saved in HTML
format, just uploading the files to the web space and serving it up as a
new page on the site. Each slide is saved as a separate image, with its
own page, so you have an entire folder of files to upload to your
server.
Disadvantage -
1. Saving in
HTML from the PowerPoint software is that the resulting web presentation
is optimized for Internet Explorer.
2. It will not
display properly for website visitors who are using
other browsers.
3. FLASH IT
OpenOffice offers to export the presentation as a Flash (SWF) format.
Free tools to convert PowerPoint presentations to Flash include iSpring Free, authorPOINT Lite, Speechi Light,
These are well as a host of good commercial programs, many of which will give a free trial period.
Accuracy
of the PPT-to-SWF conversion will vary
from program to program, depending in part on the complexity of
presentation.
Free screen recording software like CamStudio
— record the PowerPoint presentation as play it back on user own
computer screen and even add an audio commentary to the slideshow, if user
want.
4. ONLINE PRESENTATION SHARING WEBSITES :
There are many websites that allows users to upload and share their presentations on their sites .
EXAMPLE- Slide Share , Scribd , Slide Snack .
5. THE POWERPOINT 2010 ADVANCED OPTIONS :
The Broadcast Slide Show feature in PowerPoint 2010 enables presenters to share a slide show with anyone, anywhere, over the Web.
User send a link (URL) to the audience, and then everyone invited watches a synchronized view of your slide show in their browser.
User can send the URL for their slide show to attendees by e-mail.
During the broadcast, user can pause the slide show at any time, re-send the URL to attendees, or switch to another application without interrupting the broadcast or displaying the desktop to attendees.
Choosing a broadcast service
The Broadcast Slide Show feature requires a network service to host the slide show.
User can choose from among several services, including the following:
-
PowerPoint Broadcast Service. This service is available
to anyone with a Windows Live ID and is a good solution for those not
using a corporate network, or for presenting to an audience that is
outside your organization. Anyone on the Internet will be able to access
the URL for a slide show hosted on this service.
-
A broadcast service provided by your organization,
hosted on a SharePoint server that has the Microsoft® Office Web Apps
installed. To use this service, a broadcast site must be set up by the
site administrator and audience members must have access to site.
