
PROTECTING PRESENTATION
Before user can share an electronic copy of a Microsoft PowerPoint presentation (.pptx) or template (.potx) with other people, users can protect the presentation by various methods to prevent others from making changes to it or copying the data and prevent changes to a final version of a presentation.
THE METHODS TO PROTECT ARE:
PREPARE (OFFICE BUTTON) OPTION
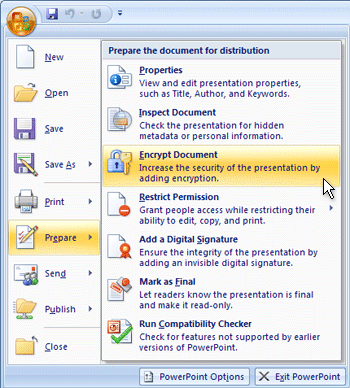
The PREPARE option in Office Button has various options for protecting a presentation . These are :
- Encrypt Document.
- Restrict Permission .
- Add a Digital Signature .
- Mark as Final .
1. ENCRYPT DOCUMENT
Encryption means protecting a presentation by a password . It can be added to PowerPoint to keep others from accessing presentation(s).
Any viewer wishing to open this presentation will have to enter a password that have been set when user encrypted the document.
On Clicking on Encrypt Document on Office Button the Password Box appears :

- In the Password box, type a password, and then click OK.User can type up to 255 characters. By default, this feature uses AES 128-bit advanced encryption. Encryption is a standard method used to help make files more secure.
- In the Reenter password box, type the password again, and then click OK.
- To save the password, save the file.
Set a password to modify a PowerPoint presentation
In addition to setting a password to open a PowerPoint presentation, user can set a password to allow others to modify the presentation.
- Click the Microsoft Office Button
 , click Save As, and on the bottom of the Save As dialog, click Tools.
- On the Tools menu, click General Options. The General Options dialog opens.
- Under File sharing settings for this document, in the Password to modify box, type a password.
- In the Confirm Password dialog, re-type the password. Click OK.
- Click Save.
2. RESTRICT PERMISSION
This option has Restricted Access, Unrestricted Access and Manage Credentials as 3 options.
RESTRICTED ACCESS-
In Office 2007 (c), depending upon which edition user own, user can use Information Rights Management to allow only specified individuals to access a document.
Using Information Rights Management, user can :
- Assign specific rights to each user, including restricting the ability to copy, print, forward, modify, or fact a document.
- Set an expiration date after which a user cannot access the document.
To restrict permission to a document, follow the steps below:
- Click the Microsoft Office button, point to Prepare, Restrict Permission and then click Restricted Access.
- In the Permission dialog box, click Restrict Permission To This Document.
- In the Read and Change boxes, add e-mail addresses for those to whom user want to grant permission.
- User can click Read or Change to select a user name from their address book.
- Enter addresses of users to whom to grant full control in the Read or Change box.
To customize permissions, click More options. In the dialog box, user can change permission levels to add further permissions such as setting an expiration date or allowing printing.
Information Rights Management is only available in Microsoft Office 2007 Ultimate, Professional Plus and Enterprise editions and will require the installation of the Windows Rights Management client.
UNRESTRICTED ACCESS :
This option is used to disable PowerPoint from password .
Click Office Button > Prepare > Restrict Permission > Unrestricted Access .
By Default the Unrestricted option is selected .
MANAGE CREDENTIALS
User can have one set of credentials per licensing server.
If user connect to more than one licensing server, add the credentials for each licensing server.
For example, if user work with Company A and Company B, when user is connected to Company A's network, user can add their credentials for Company A's licensing server, and then can do the same thing when connected to Company B's licensing server.
3. ADD A DIGITAL SIGNATURE
A digital signature is an electronic, encrypted, stamp of authentication on digital information such as e-mail messages, macros, or electronic documents. A signature confirms that the information originated from the signer and has not been altered.
Signing certificate and certificate authority
SIGNING CERTIFICATE -To create a digital signature, user have to have a signing certificate, which proves identity. When user send a digitally-signed macro or document, user also send your certificate and public key.
Certificates are issued by a certification authority, and like a driver’s license, can be revoked.
A certificate is usually valid for a year, after which, the signer must renew, or get a new, a signing certificate to establish identity.
CERTIFICATE AUTHORITY (CA)
A certificate authority is an entity similar to a notary public. It issues digital certificates, signs certificates to verify their validity and tracks which certificates have been revoked or have expired.
Microsoft Office has several solutions for obtaining certificates through Office Marketplace, Digital Signing.
Digital signature assurances
- Authenticity The signer is confirmed as the signer.
- Integrity The content has not been changed or tampered with since it was digitally signed.
- Non-repudiation Proves to all parties the origin of the signed content. Repudiation refers to the act of a signer denying any association with the signed content.
- Notarization Signatures in Word, Excel, or PowerPoint files, which are time stamped by a secure time-stamp server, under certain circumstances, have the validity of a notarization.
To make these assurances, the content creator must digitally sign the content by using a signature that satisfies the following criteria:
- The digital signature is valid.
- The certificate associated with the digital signature is current (not expired).
- The signing person or organization, known as the publisher, is trusted.
Signed documents, which have a valid time stamp, are considered to have valid signatures, regardless of the age, or revocation status, of the signing certificate.
- The certificate associated with the digital signature is issued to the signing publisher by a reputable certificate authority (CA).
An invisible digital signature, such as a visible digital signature line, assures the authenticity, integrity, and origin of a document. You can add invisible digital signatures to Word documents, Excel workbooks, and PowerPoint presentations.
Signed documents will have the Signatures button at the bottom of the document.
4. MARK AS FINAL :
When a presentation is marked as final, typing, editing commands, and proofing marks are turned off and the presentation becomes read-only. Additionally, the Status property of the document is set to Final.
The Mark as Final command helps communicate that user is sharing a completed version of a presentation. It also helps prevent reviewers or readers from making accidental changes to the presentation.
The Mark as Final command makes a presentation read-only, but it is not a security feature. Anyone who receives an electronic copy of a presentation marked as final can reverse the Mark as Final status and edit the presentation.
- To determine whether a presentation is marked as final, look for the Mark as Final icon in the status bar at the lower left of the PowerPoint window, as shown in the following figure:

- To unlock a presentation that is marked as final and make it writable again, repeat the steps to mark a presentation as final.
Remove Read-only protection from a presentation
- Open the presentation that is marked as final, and then click the File tab.
- In the left pane, click Info.
- Click Protect Presentation, and then click Mark as Final to undo Mark as Final status.
